
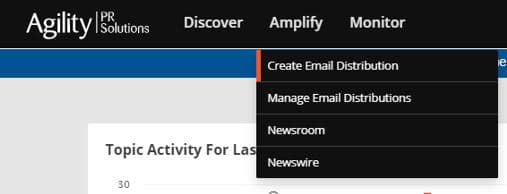
Within any set of targeting search results or a saved list, you can distribute to your chosen contacts by selecting Actions and Distribute Via Email. Or, from any place in Agility you can click Amplify and Create Email Distribution at the top of the screen.
If you have any questions, or want any help, never hesitate to contact Agility Support https://www.agilitypr.com/agility/support/.
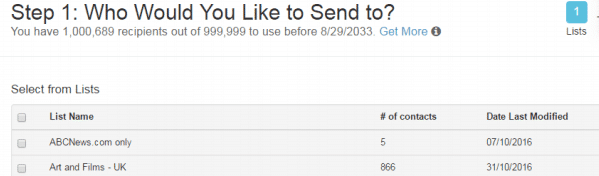
Step 1 - Who do you want to send your press release to?
Here you are asked to pick a list or saved search of contacts that you would like to send your press release to.
At the bottom of the page, you then have an Add Additional Email Addresses box, where you can add contacts not on your lists. This can include other journalists and influencers, colleagues or anyone else you wish to send the email.
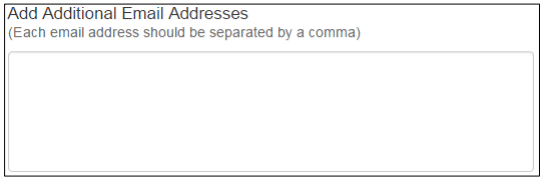
Note: Any emails put in this box will come out of your email allowance.
Once you are happy with your selection, click the “Next Step” button at the bottom of the page.
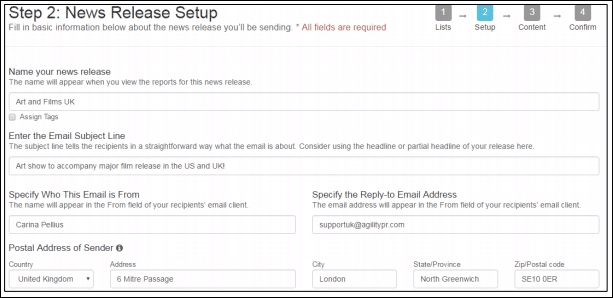
Step 2 – Who is your email from, and who can your contacts reply to?
Step two allows you to personalise your email with a subject, sender details and a reply-to address.
The name of the release is something that only you will see. It simply helps you label and recognise this job in future. Choose a name that makes sense for your campaign or project, such as the headline of your press release.
At this stage you can tag your distribution if you’d like colleagues to work on it with you or see the results.
The subject is what your recipients will see in the subject field of their inbox, again it makes sense to use the headline of your press release, or something that will greet the recipient and encourage them to open your email.
The from field is for you to identify the name of the person or organisation you are sending on behalf of.
The reply to address is the address that any replies from the contacts will go to. Make sure you choose an email address that you are happy to receive replies to.
It is a legal requirement to specify the postal address of the sender, so please complete these fields.
Then you simply need to select the time at which you’d like your distribution to be released. You can select immediate or scheduled distribution. Make sure you have selected the correct time zone if you’re scheduling a distribution for the future. If you choose another time zone, you have the option to make that time zone default.


Step two allows you to go back to step one, cancel the whole distribution process, save this as a draft or move on to step three.
![]()
Step 3 – Content
Best practice is to create and edit your content directly in the editor, which gives you access to a selection of tools that enable you to format your content. You can include anchor links, images, tables and block quotes, as well as styling your content as you wish. We have added the ability to make your font-size responsive rather than static, by selecting an em unit for your text rather than the traditional static font-size.
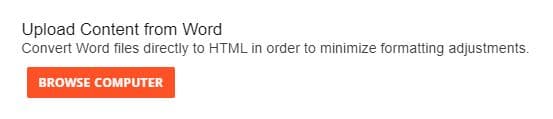
If you do prefer to use content from a Word document that you have created, we do advise uploading it using Browse Computer rather than copying and pasting it into the editor. There are a few best practices you should follow on Word before uploading the file on Agility. Open your word file and ensure that all content is sitting outside of headers and footers, also check the formatting of your content in the web layout of word by clicking on View > web layout. This allows you to see how your email may look once converted to HTML and delivered to inboxes, although please remember that Word files are not designed to be mobile friendly and so we cannot guarantee an exact replication for you.
If you’re concerned about the appearance of your email on mobile platforms, we have some further tips here: How do I make my emails easier to read on phones or tablets?
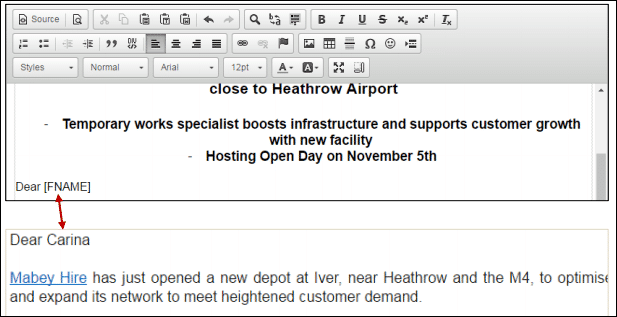
The content editor has a range of functions to allow you to further update the layout or format of your content, and it also supports mail merge options. By inserting Dear [FNAME] in to your text, for example, you would draw upon the first names of the contacts in your list, which allows you to greet them individually.

You also have the option to attach files to your distribution, this can be found just below the editor. Note that the size of the attachment can be no bigger than 5 MB.

At the bottom of the editor is the signature that has pulled information from step two, as well as your account settings. This is mandatory as it is a legal requirement in many countries for electronic communication. It will state your name and reply to email address, the company name, the company address and the email address of the person logged into the account.
At this point, you should send yourself a test email to see exactly what the email will look like when it reaches inboxes. Simply type in your email address, plus the address of any colleagues and the test email will be sent to you immediately. You can save the distribution as a draft while you review the test, or go straight to the last step.
Step 4 – Confirm: Are you happy with the email?
This is your confirmation page, you can go through everything you have filled out and make sure everything is how you want it. If you do need to make changes, there are edit buttons on the right hand side of every section. Clicking this will take you back to the relevant page to make changes.

Note: You may notice the number of recipients decreases at this point. This is because, Agility removes duplicates from the targeted list. Meaning, if there are contacts with email addresses that appear more than once, Agility will delete the duplicates so that the contact only receives the email once.
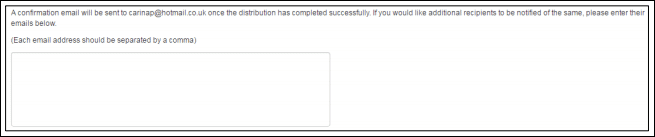
After you have checked all areas, you then have the option to send other people the confirmation email to say this distribution has been sent. You will get the email by default.
When you are happy with the whole distribution, you can then tick the check box, agreeing to either sending it out immediately or with the scheduled time and then press submit.

